As Kubernetes gains popularity, it is not uncommon to end up with multiple clusters within a single enterprise. Sometimes this is due to the organic adoption of Kubernetes across multiple teams. Sometimes it is intentional for a range of reasons such as operational ownership, geographic redundancy, security or compliance needs. As the number of clusters grows, at some point it is almost inevitable that an application or microservices hosted in one cluster will need to securely communicate with one hosted in another cluster. In this blog post we will explore how to achieve this goal using Submariner, including a step-by-step hands on tutorial.
Submariner is an open source project that can connect multiple Kubernetes workloads seamlessly across multiple clusters. Utilizing secure tunnels (IPSec or WireGuard tunnels), Submariner provides cross-cluster Layer 3 connectivity and helps to design a secure flat network overlay in a multi cluster environment. A unique feature of Submariner is the Lighthouse project which provides a DNS-friendly service discovery component to extend Kubernetes cluster service visibility in a multiple cluster environment.
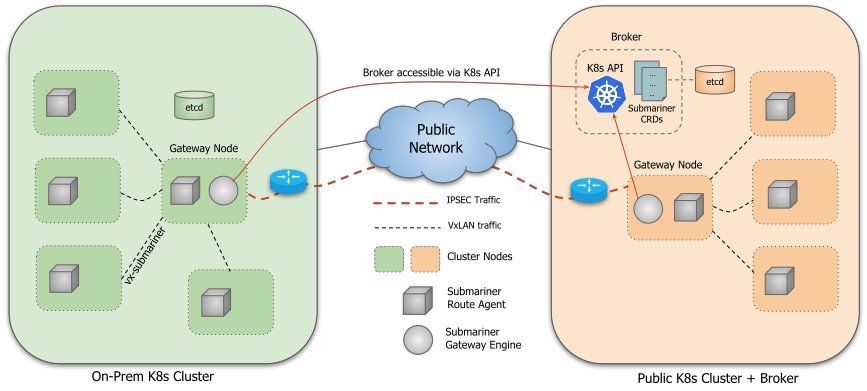
This image shows Submariner components in a multi-cluster environment.
Submariner consists of several components that work in conjunction with each other to provide these features. These components are:
- Broker
- Gateway Engine
- Route Agent
- Service Discovery
- Globalnet Controller **Optional**
The Broker acts as the central source of truth for what resources should be visible in each cluster within a cluster set. The Broker component uses Kubernetes Custom Resource Definitions (CRDs) to facilitate the exchange of metadata information between Gateway Engines. Using the Kubernetes API, Gateway Engines that are participating in a cluster set can query the Broker to get the information needed to establish secure tunnels between the clusters. The Broker can be deployed on a public or on-prem Kubernetes cluster. It is essential that all participating clusters in the cluster can access the Broker Kubernetes API resources.
Participating clusters create a Gateway Engine pod to manifest tunnels, Gateway Engines communicate with the Broker to advertise their resources and query the Broker about other clusters that are engaged in the cluster set. These tunnels can be secured using IPSec technology or WireGuard. Submariner supports high availability for Gateway Engine components by allowing multiple instances of it to be deployed on a cluster. It is important to note this component works in an active/passive manner and only one Gateway Engine is active at a time. The Route Agent component runs on every node in each participating cluster. It is responsible for setting up VXLAN tunnels and routing the cross cluster traffic from the node to the cluster’s active Gateway Engine which subsequently sends the traffic over its tunnels to the destination clusters. Service Discovery components allow Kubernetes cluster services to be published in the cluster set. This is achievable using the Kubernetes Multi-Cluster Service API.
Submariner normally requires participating clusters to use unique private CIDRs for their K8s pods. But given the limited number of available private IPv4s, this might be a challenge in some cases. Globalnet Controller is an optional component of Submariner that can support clusters with overlapping CIDRs. It does this by allocating a single (non-overlapping) global IP address to represent each service or pod that requires cross-cluster access, setting up address translation between this global IP and the normal cluster IPs on the Gateway nodes.
Getting Hands-on!
We will set up three sandboxed Kubernetes clusters using Kind and Docker. Then we will continue our journey by installing Calico and applying some necessary modifications to prepare our environment for Submariner deployment.
Requirements
There are a few requirements that you need in order to follow this post.
- 4GB of free RAM
- Install kind
- Install docker
- Install kubectl
- Install calicoctl
Some points to note:
- You may need to change the default Docker RAM setting to ensure the 4GB is available to the Kind cluster.
- Make sure you have calicoctl v3.18.0 or above, since the –context argument is not supported by older versions).
- Kind manifests in this blog post are compatible with v0.9.0 or higher of the software, so please make sure you have a compatible copy of Kind.
Create the Clusters
Let’s create three clusters using Kind. It’s possible to form a cluster set with only two clusters. However, in this example we will use a Kubernetes control plane to act as a broker in our cluster set to simplify the concept. Using a single control-plane our first cluster is just a Kubernetes API server to hold the broker.
kind create cluster --config - <<EOF
kind: Cluster
name: broker
apiVersion: kind.x-k8s.io/v1alpha4
nodes:
- role: control-plane
networking:
  podSubnet: "10.240.0.0/16"
  serviceSubnet: "10.110.0.0/16"
  disableDefaultCNI: true
EOF
Second and third clusters are going to have both control-plane and worker nodes. This is where we deploy our applications.
kind create cluster --config - <<EOF
kind: Cluster
name: c1
apiVersion: kind.x-k8s.io/v1alpha4
nodes:
- role: control-plane
- role: worker
networking:
  podSubnet: "10.241.0.0/16"
  serviceSubnet: "10.111.0.0/16"
  disableDefaultCNI: true
EOF

kind create cluster --config - <<EOF
kind: Cluster
name: c2
apiVersion: kind.x-k8s.io/v1alpha4
nodes:
- role: control-plane
- role: worker
networking:
  podSubnet: "10.242.0.0/16"
  serviceSubnet: "10.112.0.0/16"
  disableDefaultCNI: true
EOF
Verify Cluster Deployment
It is possible to verify cluster deployment using Kind by issuing the following command
kind get clusters
you should see `broker`, `c1` and `c2` in the result
Install Calico
There are many different ways to install Calico. We will be using the Calico operator, created by Tigera for our installation. This method offers simplification for installing and configuring Calico without needing to customize manifests. Additionally, the operator allows you to have a uniform, self-healing environment.
**Note**: Throughout this blog post we will pass `–context` to both `kubectl` and `calicoctl`. This option will temporarily change the current context in `kubeconfig` file, which will improve the experience of switching between different clusters.
Install the operator using the following command.
kubectl --context kind-c1 create -f http://docs.projectcalico.org/manifests/tigera-operator.yaml
Operator expects an installation CRD with Calico configuration in order to start the installation process. Using the following command we will create the configuration
kubectl --context kind-c1 create -f - <<EOF
apiVersion: operator.www.tigera.io/v1
kind: Installation
metadata:
  name: default
spec:
  calicoNetwork:
    ipPools:
    - blockSize: 26
      cidr: 10.241.0.0/16
      encapsulation: VXLANCrossSubnet
      natOutgoing: Enabled
      nodeSelector: all()
EOF
Install Calico on the second cluster.
kubectl --context kind-c2 create -f http://docs.projectcalico.org/manifests/tigera-operator.yaml
kubectl --context kind-c2 create -f - <<EOF
apiVersion: operator.www.tigera.io/v1
kind: Installation
metadata:
  name: default
spec:
  calicoNetwork:
    ipPools:
    - blockSize: 26
      cidr: 10.242.0.0/16
      encapsulation: VXLANCrossSubnet
      natOutgoing: Enabled
      nodeSelector: all()
EOF
Verify Calico Deployment
Calico uses calico-system namespace for its components. You can verify the installation process by monitoring that namespace using the following command:
kubectl --context kind-c1 get pods -n calico-system
kubectl --context kind-c2 get pods -n calico-system
You should see a result similar to:
Every 2.0s: kubectl get pods -n calico-system                                        WIN-9PP6B30O84U.hitronhub.home: Mon Dec 21 16:32:01 2020

NAME                                       READY   STATUS    RESTARTS   AGE
calico-kube-controllers-776967cffb-ngj5j   1/1     Running   0          3m47s
calico-node-2pwst                          1/1     Running   0          3m48s
calico-node-qfh8n                          1/1     Running   0          3m48s
calico-typha-554c57d4d9-49t7x              1/1     Running   0          110s
calico-typha-554c57d4d9-zk7zp              1/1     Running   0          3m49s
Make sure pods are in a ”Running” state before continuing
Configure Calico IPPools
IPPools are Calico resources which define a range of IP Addresses that Calico can use. As an example, Source Network Address Translation (SNAT) is typically used when a Pod within an IP pool needs to reach a resource outside of an IP pool (for example, the Internet). Since we don’t want Calico to NAT traffic between our clusters, we will create IPPools in each cluster for the pod CIDRs of the other clusters. This will disable SNAT for outgoing traffic when it is destined for other clusters in our cluster set, but still allow pods to talk to the Internet using NAT.
calicoctl --context kind-c1 create -f - <<EOF
apiVersion: projectcalico.org/v3
kind: IPPool
metadata:
 name: svc-c2
spec:
 cidr: 10.112.0.0/16
 natOutgoing: false
 disabled: true
---
apiVersion: projectcalico.org/v3
kind: IPPool
metadata:
 name: pod-c2
spec:
 cidr: 10.242.0.0/16
 natOutgoing: false
 disabled: true
EOF
Repeat the process for the second cluster.
calicoctl --context kind-c2 create -f - <<EOF
apiVersion: projectcalico.org/v3
kind: IPPool
metadata:
 name: svc-c1
spec:
 cidr: 10.111.0.0/16
 natOutgoing: false
 disabled: true
---
apiVersion: projectcalico.org/v3
kind: IPPool
metadata:
 name: pod-c1
spec:
 cidr: 10.241.0.0/16
 natOutgoing: false
 disabled: true
EOF
Control Plane Connectivity
**Note**: Docker on Mac and Windows has some limitations when it comes to communicating between host and containers. We will use the Broker `control-plane` node to install the Submariner command line utility and join our other clusters to the cluster set. Let’s export control planes IP Address as environment variables to prepare for our Submariner installer.
export BROKER=$(kubectl --context kind-broker get nodes --field-selector metadata.name=broker-control-plane -o=jsonpath='{.items[0].status.addresses[0].address}')
export C1=$(kubectl --context kind-c1 get nodes --field-selector metadata.name=c1-control-plane -o=jsonpath='{.items[0].status.addresses[0].address}')
export C2=$(kubectl --context kind-c2 get nodes --field-selector metadata.name=c2-control-plane -o=jsonpath='{.items[0].status.addresses[0].address}')
`kubectl` uses the kubeconfig file to communicate with Kubernetes clusters. Copy kubeconfig file from host to the broker container using the following command:
docker cp ~/.kube/config broker-control-plane:/root/.kube/config
Attach to the Broker container tty session and pass IP Address environment variables using the following command:
docker exec -it --env BROKER --env C1 --env C2 broker-control-plane /bin/bash
Your shell should change to:
root@broker-control-plane:/#
**Note**: At this point commands are executed in the `broker-control-plane` container.
Let’s use environment variables that we passed into the container to set the correct IP Addresses in our kubeconfig file.
kubectl config set-cluster kind-broker --server http://$BROKER:6443/
kubectl config set-cluster kind-c1 --server http://$C1:6443/
kubectl config set-cluster kind-c2 --server http://$C2:6443/
Submariner command line utility `subctl` requires `xz-utils`, Install this package by executing the following command
apt update -y && apt install xz-utils -y
Issue the following commands in order to install `subctl`
curl -Ls http://get.submariner.io | bash
export PATH=$PATH:/root/.local/bin
Make sure you remain in the container for next steps.
Designate a Broker
Submariner uses a Broker to advertise information changes and updates between clusters. If your set-up consists of on-prem and public clusters, it’s better to deploy the Broker in a public cloud cluster for high availability. It’s worth mentioning that when the Broker is unavailable, dataplane traffic will not be affected and all clusters can still talk to each other. However, it will not be possible to introduce new clusters. (View this Link if you like to know more about Broker)
Join c2 Cluster to the Broker
Use `subctl`command to connect clusters together.
subctl join --kubecontext kind-c1 broker-info.subm --clusterid kind-c1 --disable-nat
subctl join --kubecontext kind-c2 broker-info.subm --clusterid kind-c2 --disable-nat
You should see a result similar to:
* broker-info.subm says broker is at: http://172.19.0.3:6443
⠈⠱ Discovering network details     Discovered network details:
     Network plugin:  generic
     Service CIDRs:   [10.111.0.0/16]
     Cluster CIDRs:   [10.244.0.0/16]
 ✓ Discovering network details
 ✓ Validating Globalnet configurations
 ✓ Discovering multi cluster details
 ✓ Deploying the Submariner operator
 ✓ Created operator CRDs
 ✓ Created operator namespace: submariner-operator
 ✓ Created operator service account and role
 ✓ Created lighthouse service account and role
 ✓ Created Lighthouse service accounts and roles
 ✓ Deployed the operator successfully
 ✓ Creating SA for cluster
 ✓ Deploying Submariner
 ✓ Submariner is up and running
Do not exit the container if you wish to verify cluster connectivity
Check Cluster Connectivity
Create a normal nginx deployment and service using kubectl by issuing the following commands:
kubectl --context kind-c1 create deployment nginx --image=nginx
kubectl --context kind-c1 expose deployment nginx --port=80
Now use subctl to expose this service for other clusters
subctl export service --kubecontext kind-c1 --namespace default nginx
From c2, try to check if nginx service is accessible.
kubectl --context kind-c2 -n default  run --generator=run-pod/v1 \
tmp-shell --rm -i --tty --image quay.io/submariner/nettest -- /bin/bash
After you are prompted with a bash command line, issue the following command:
curl nginx.default.svc.clusterset.local
You should see a result similar to:
<!DOCTYPE html>
<html>
<head>
<title>Welcome to nginx!</title>
<style>
    body {
        width: 35em;
        margin: 0 auto;
        font-family: Tahoma, Verdana, Arial, sans-serif;
    }
</style>
</head>
<body>
<h1>Welcome to nginx!</h1>
<p>If you see this page, the nginx web server is successfully installed and
working. Further configuration is required.</p>

<p>For online documentation and support please refer to
<a href="http://nginx.org/">nginx.org</a>.<br/>
Commercial support is available at
<a href="http://nginx.com/">nginx.com</a>.</p>

<p><em>Thank you for using nginx.</em></p>
</body>
</html>
That’s It!
Following the instructions in this blog post, you now have established secure communication and shared services between multiple clusters using Submariner!
Clean Up
kind delete clusters broker c1 c2
If you enjoyed this blog post, you might also like:
- Blog: Hands on with Calico’s eBPF data plane native service handling
- Free Online Training: www.tigera.io/free-training-resources
- Learn more about Calico Enterprise
Join our mailing list
Get updates on blog posts, workshops, certification programs, new releases, and more!