Last month Mesosphere made industry news by launching DC/OS, the first open source release of their Datacenter Operating System. As a launch partner, we were excited to introduce a Calico package for DC/OS that made installing Calico in DC/OS a few easy clicks.
In this blog post, we’ll discuss the benefits of using Calico in DC/OS. Then, we’ll walk through launching and using a sample application in DC/OS with Calico Networking.
Why Use Calico for DC/OS?
The Calico approach to networking allocates a unique, routable IP address to each workload in the datacenter. This is a departure from traditional Mesos networking, where workloads are typically addressed using the host’s IP, and ports are treated as a limited resource that are mapped through to the workloads. There are many reasons we feel this is the right approach to networking. I won’t touch on all of them, as we discuss many of them on our General Calico Information page, but here are a few points very relevant to Mesos:
No Port Conflicts – Traditional Mesos port resource pools means that each Agent in the cluster has a finite number of ports to offer to each task. With Calico, each task receives a unique IP address unused by any other service, allowing it to make use of the full range of ports without any fear of conflict.
No Port Forwarding – With access to the full port range, Mesos no longer needs to configure port forwarding between agent ports and service ports. If you’re trying to run a webserver on port 80, it can listen on port 80, and you can reach it on port 80. Period.
Policy – Calico can enforce fine-grained, declarative security policies to ensure that applications can communicate only with the services they are meant to. This level of network security does not otherwise exist in standard Mesos Networking.
Walkthrough
Let’s take a look at how Calico integrates with DC/OS. In this post, we’ll install the Calico Universe package. Then, we’ll use Marathon to deploy and scale a two-tier web app comprised of a flask frontend and a redis database, each using docker containers networked with unique Calico IP addresses. We’ll configure a security policy for each service using Calico profiles, then launch marathon-lb to load balance external traffic to our web app.
Calico can network both Mesos and Docker containers in DC/OS. For this demo, we’ll be launching a flask app that is distributed as a Docker container, so we’ll use the Docker Containerizer.
Step 1: Prerequisites
This demonstration starts with a running DC/OS cluster. If you would like to follow along, first start a cluster using one of the DC/OS Install Guides.
Note: not all DC/OS clusters are the same – ensure that yours is running Docker 1.10.0+ and you’ve configured Mesos-DNS correctly. Also ensure that your cluster has at least one master, private slave, and public slave.
Additionally, if you’re using a cluster with limited resources (such as the Vagrant-DC/OS demo), you may have to lower the amount of resources used by each universe package you install by entering the advanced installation settings of each.
Step 2: Installing Calico
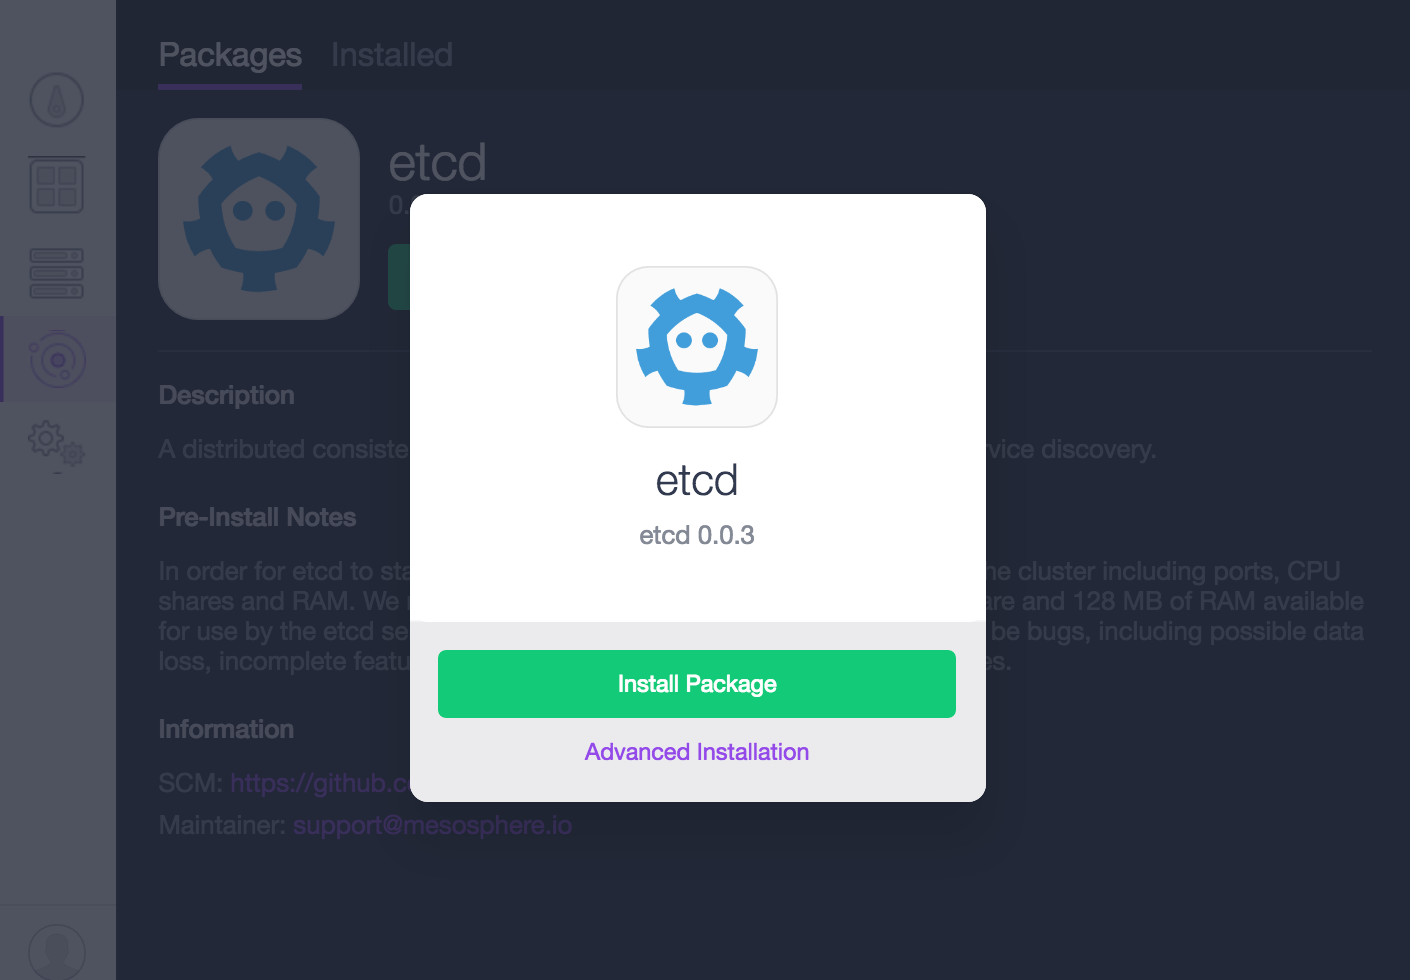
Calico uses etcd to store various configuration settings. Let’s install etcd with the Universe package manager:
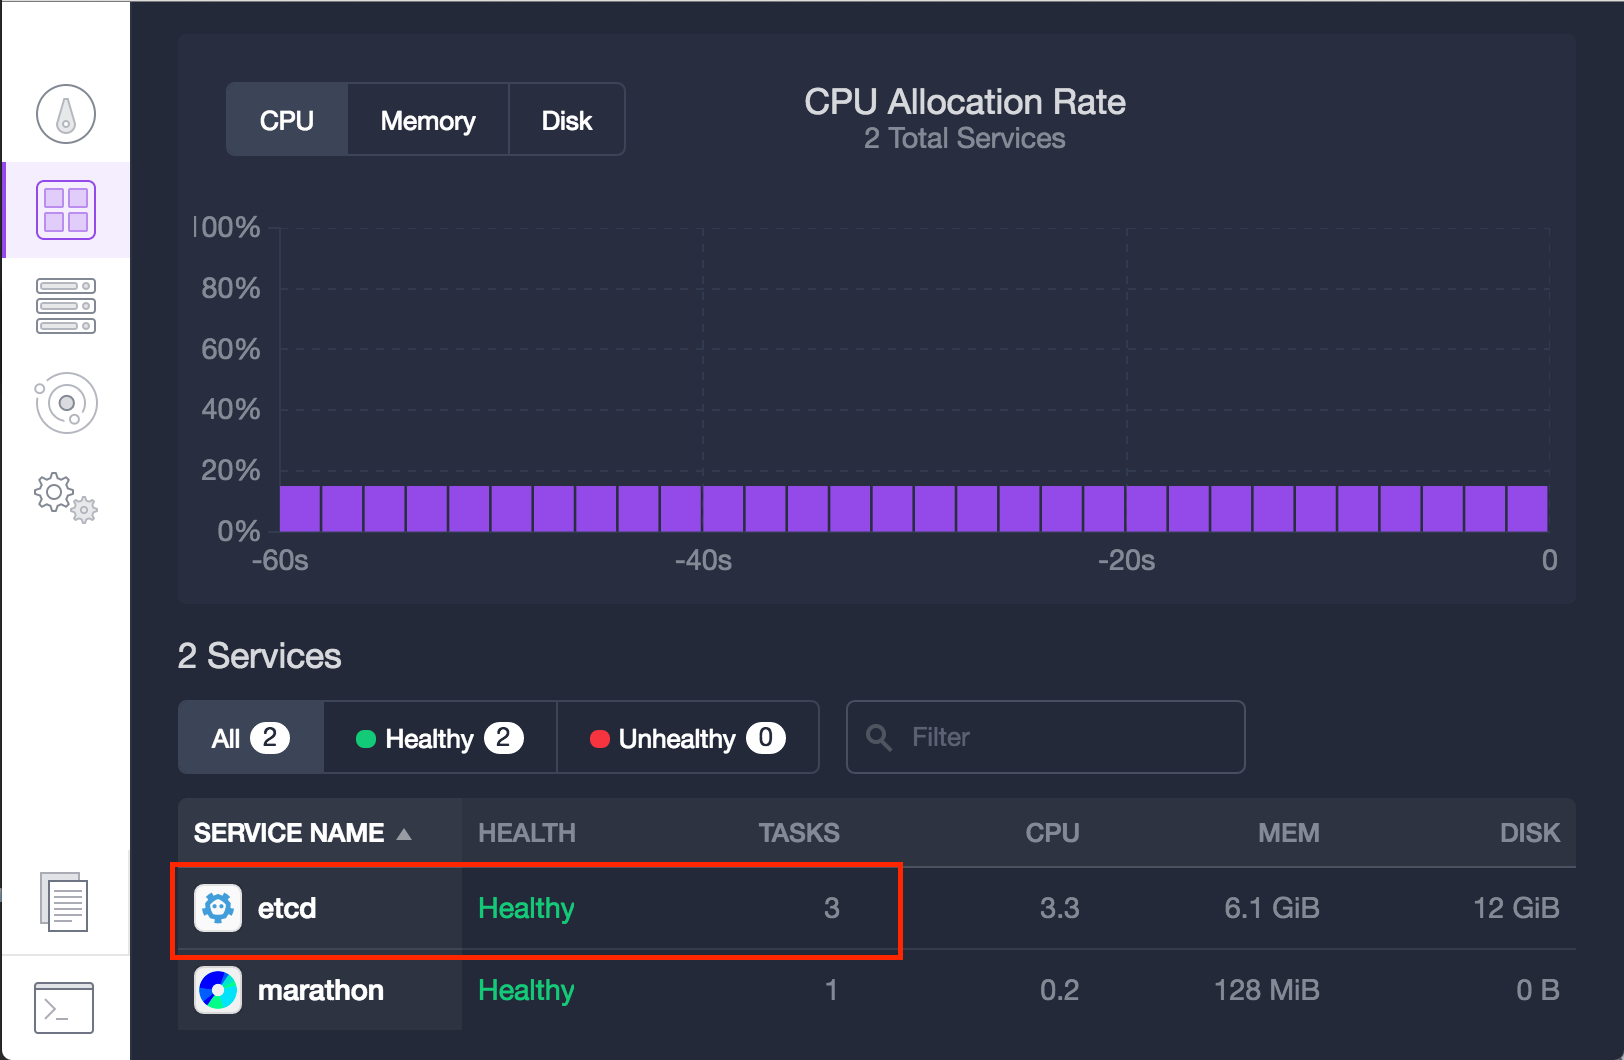
After a few minutes, etcd will appear on the DC/OS services page. We’ll wait for it to enter a Healthy state with three running tasks before continuing:
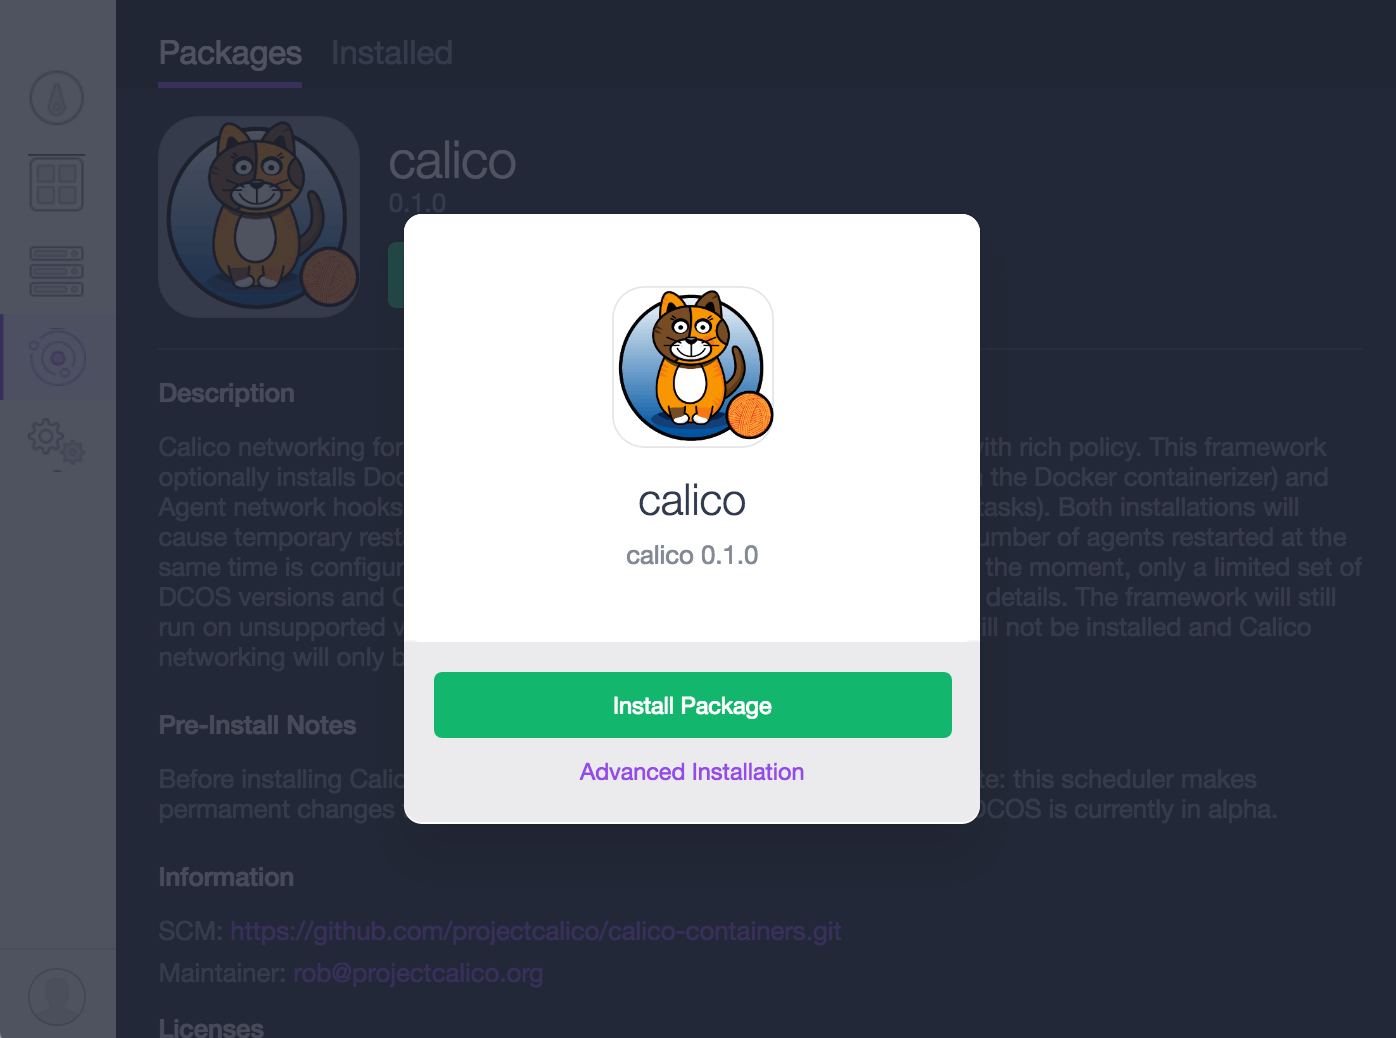
With etcd running, we’re ready to install Calico’s DC/OS Package:
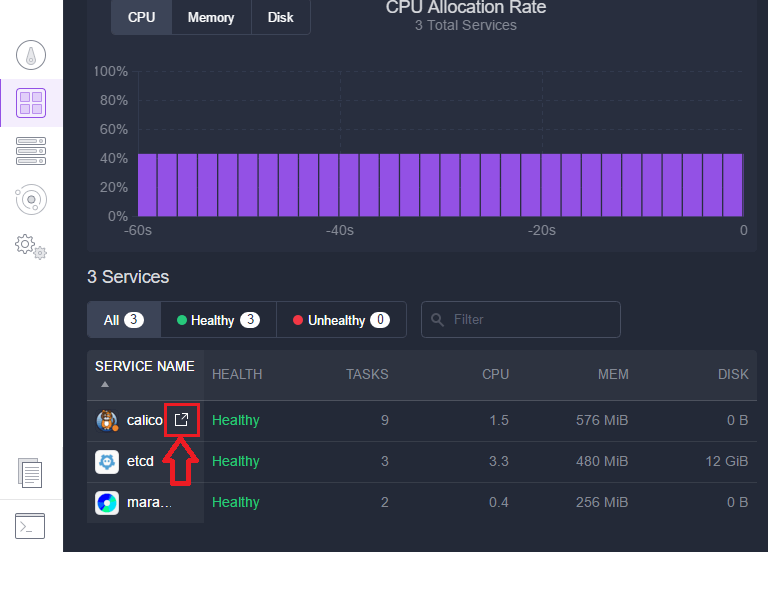
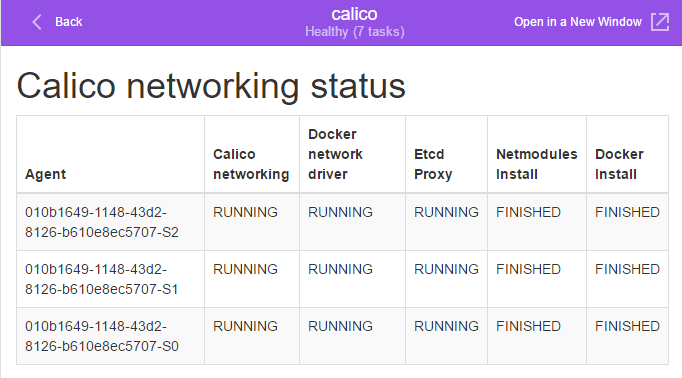
The Calico DC/OS Framework installs Calico on each agent in our cluster. It performs the installation one agent at a time to ensure cluster availability is not impacted. We can check the Calico status page as we wait for Calico to converge using the Calico Service link on the services page:
Here, we will see the status of the Calico Scheduler for each Agent in the cluster:
Step 3: Configuring Calico Security Policy
Now that Calico has converged, let’s configure docker networks for the applications we’ll be launching. We can run these docker network configuration commands directly on any agent in the cluster:
$ docker network create --driver=calico --ipam-driver=calico frontend-net
$ docker network create --driver=calico --ipam-driver=calico database-net
$ docker network ls
NETWORK ID NAME DRIVER
4a7928145df3 bridge bridge
0ce2eff6b630 database-net calico
2e117bd7bda6 frontend-net calico
7e74ebc175ce host host
887bb13e8fc9 none null
Now that we’ve created database-net and frontend-net, let’s configure policy on them. To accomplish this, we’ll use Calico’s command line tool, calicoctl, to update a few entries in etcd. This will propagate policy updates throughout our cluster. For easy access to etcd, perform the following steps directly on any agent in the cluster:
$ curl -O -L http://github.com/projectcalico/calico-containers/releases/download/v0.19.0/calicoctl
$ chmod +x ./calicoctl
$ sudo mv ./calicoctl /usr/bin/
Next, let’s configure our frontend policy. By default, Calico policy allows communication between applications on the same Docker network. This is not desirable behavior for our frontend service, as it should never be talking to other frontends. Let’s use calicoctl to remove the default rule:
$ calicoctl profile frontend-net rule remove inbound allow from tag frontend-net
We’ll replace the default rule with one which allows incoming connections only from the public slave (since that is where our load balancer will be running) to port 80 on our service (where our frontend will be listening):
$ calicoctl profile frontend-net rule add inbound allow tcp from cidr <public-slave-ip/cidr> to ports 80
We can further improve our security policy by replacing the default “allow all” outbound policy with one that’s more realistic to our service’s needs – let’s prevent this application from sending requests to any other applications except for our database:
$ calicoctl profile frontend-net rule remove outbound allow
$ calicoctl profile frontend-net rule add outbound allow tcp to ports 6379 tag database-net
Let’s review our new frontend policy:
$ calicoctl profile frontend-net rule show
Inbound rules:
1 allow tcp from cidr 192.168.65.60/32 to ports 80
Outbound rules:
1 allow tcp to ports 6379 tag database-net
With our frontend policy configured, let’s move on to the database. Our database will only need to receive incoming requests from the frontend. It should never send an outbound request to any service. Let’s replace the default policy with a rule that describes this behavior:
$ calicoctl profile database-net rule remove inbound allow from tag database-net
$ calicoctl profile database-net rule add inbound allow tcp from tag frontend-net to ports 6379
$ calicoctl profile database-net rule remove outbound allow
Let’s take a look at the new database policy:
$ calicoctl profile database-net rule show
Inbound rules:
1 allow tcp from tag frontend-net to ports 6379
Outbound rules:
And with that, we’ve implemented a very restrictive network policy that allows traffic only from sources and to destinations that are essential to each individual component of our application.
Step 4: Deploying an Application
With our policy configured, we’re ready to launch our application. We’ll be using Marathon, the container orchestrator included in DC/OS.
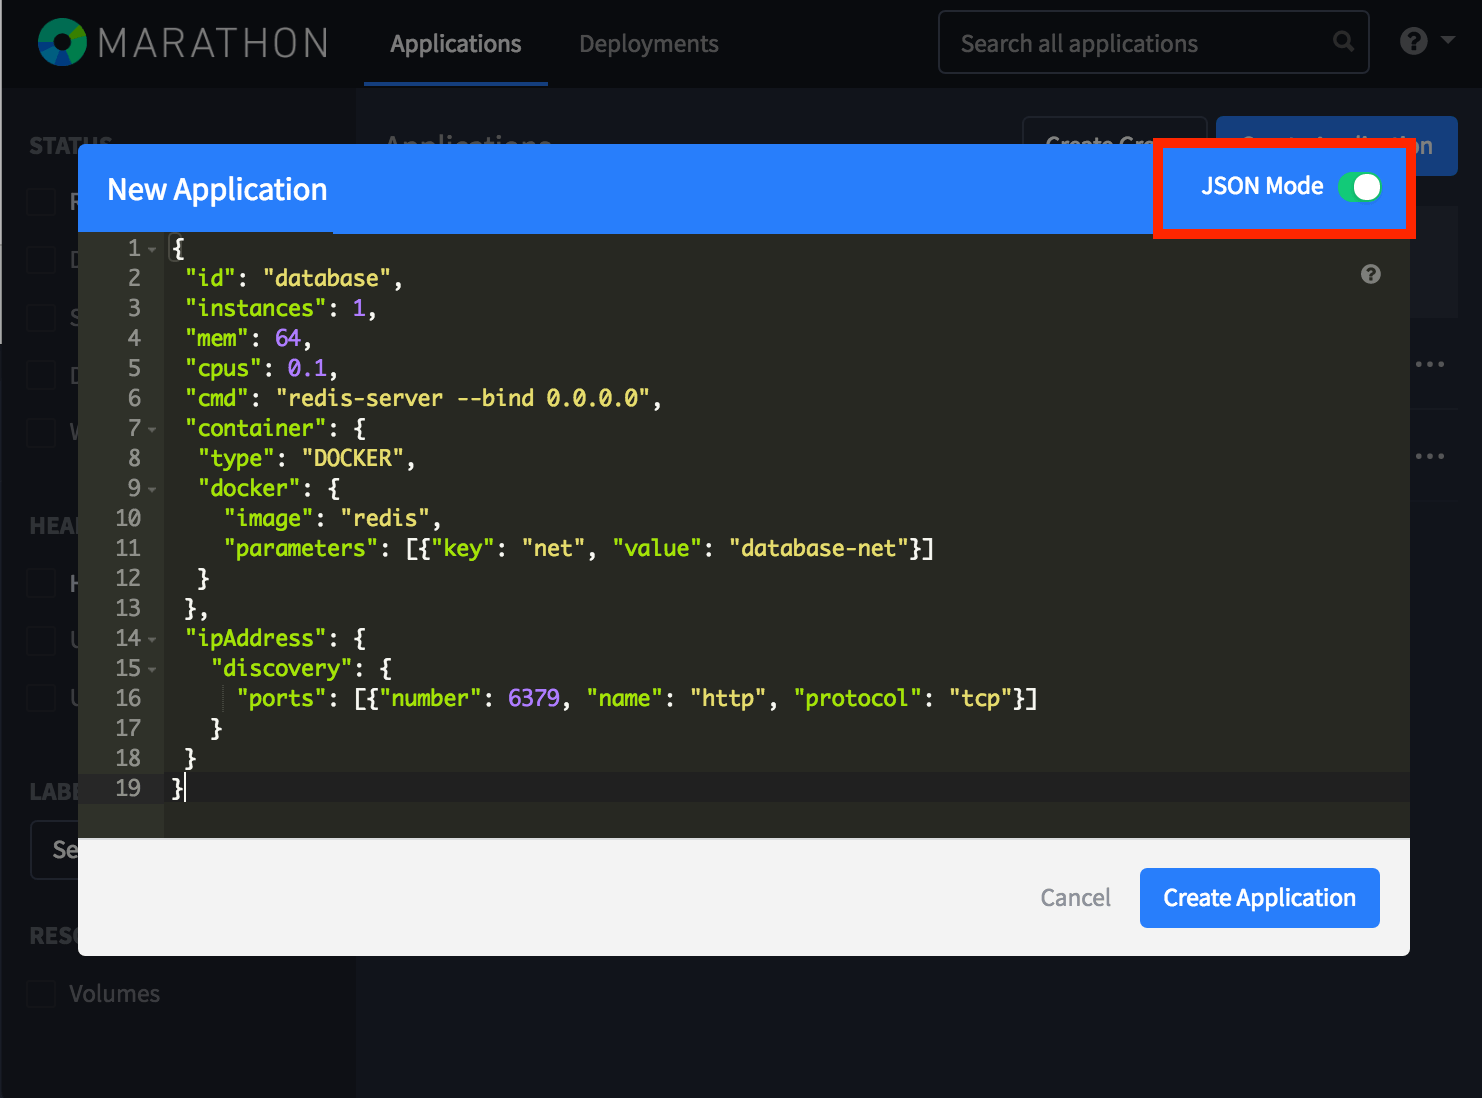
The following Marathon application definition will launch our redis database in DC/OS on the newly created Calico database-net:
In the above definition, we’ve selected the database-net for our application by passing in a docker parameter. This will apply the database-net security profile we configured earlier to the running task. Additionally, we’ve specified the ipAddress field. This field alerts marathon and mesos that this is an ip-per-container application. Marathon and Mesos will now operate under the assumption that this app is accessible directly via its IP address, and will perform health checks on that IP address instead of the host’s. Within the ipAddress field, we’ve also specified a discovery port. The discovery ports field informs Marathon and other Mesos components which ports our services will be listening on. To launch the database application, paste the above JSON into Marathon’s JSON mode field when creating a new app:
Next, let’s launch our app’s frontend. For this demo, we’ve built a very simple flask app which keeps track of page views by storing that information in our redis container. Additionally, it prints the hostname of the server that rendered it. Here’s what that code looks like:
We’ve containerized this app using the following dockerfile:
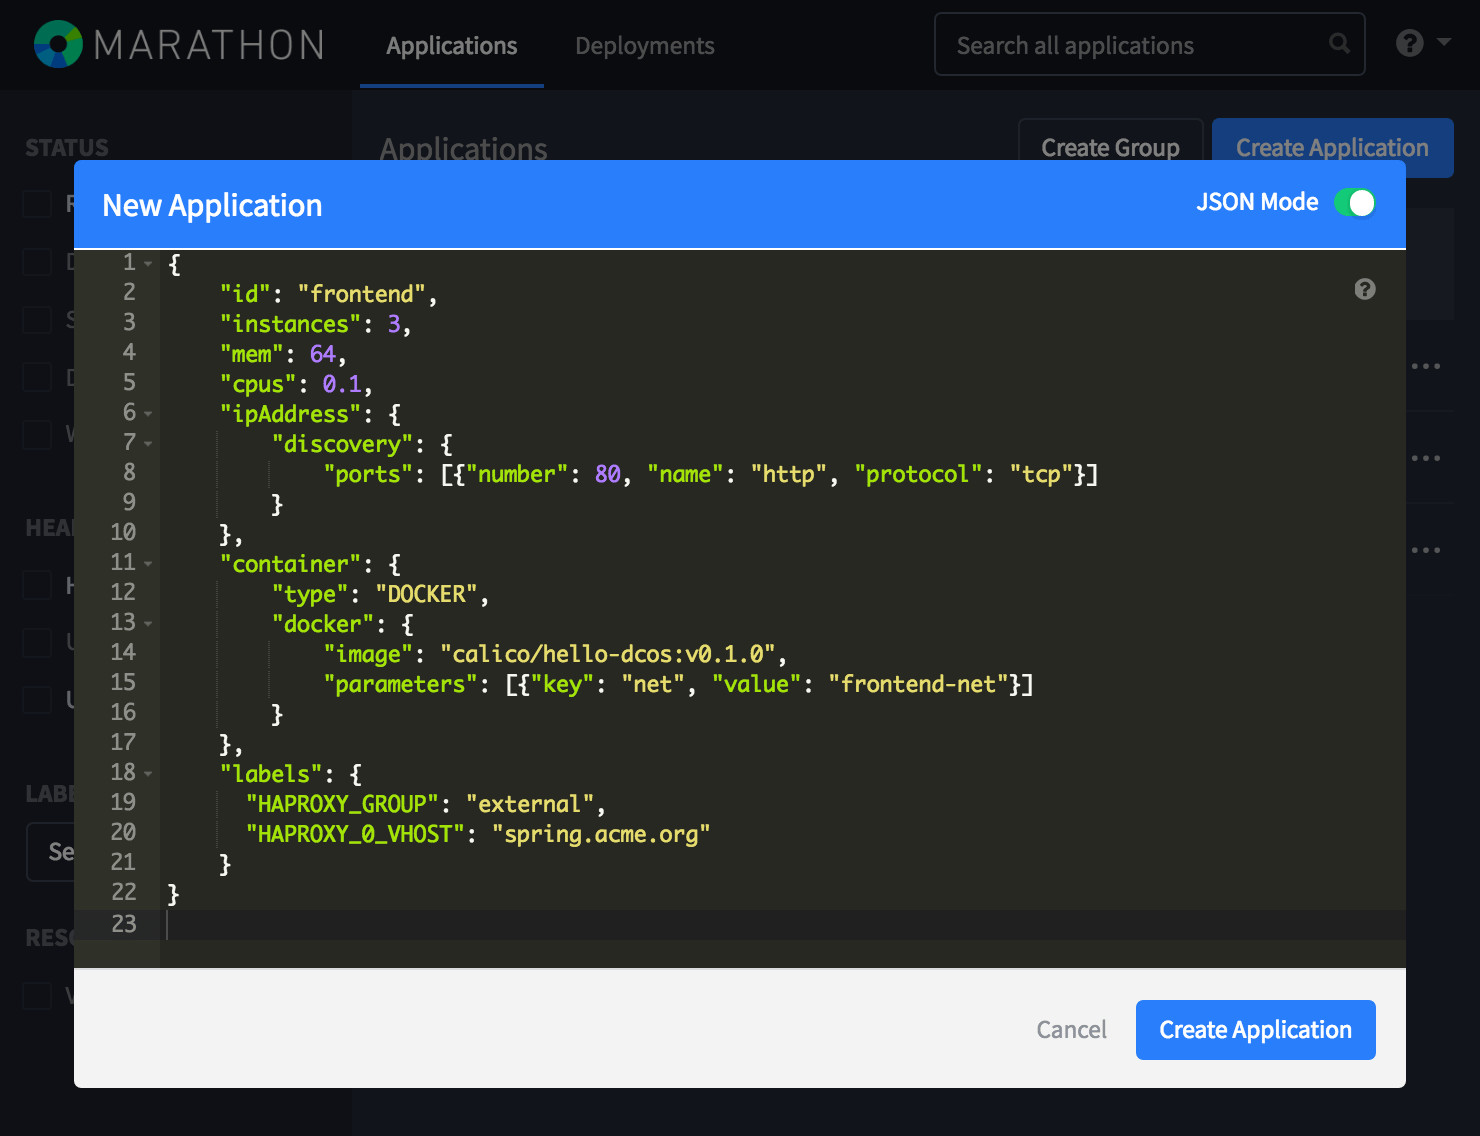
For speed, we’ve built and pushed it for general availability as “calico/hello-dcos:v0.1.0“. We’ll deploy that container using the following marathon application definition:
This application definition is similar to our first, with a few slight adjustments. First, to keep up with the “enormous demand” for our application, we’ve scaled the frontend to three instances. Additionally, you’ll notice we’ve added some HAPROXY configuration settings here. But we’ll touch on that later, when we connect our webapp to the load balancer. And of course, you’ll notice we’ve specified that this frontend application should join the “frontend-net” Docker network.
From the Marathon UI, launch this application by pasting the JSON in the JSON entry field:
Checking Network Connectivity
And with that, our app is now deployed in DC/OS using Calico! Let’s take a step back and see what that means exactly.
Calico is compatible with Mesos DNS, which means if we look up our app’s DNS entry, we’ll see it resolves to the Calico IP:
$ nslookup database.marathon.mesos
Server: 198.51.100.1
Address: 198.51.100.1#53
Name: database.marathon.mesos
Address: 192.168.0.0
If we perform a DNS lookup of our scaled frontend app, we will see the Calico IP assigned to each instance:
$ nslookup frontend.marathon.mesos
Server: 198.51.100.1
Address: 198.51.100.1#53
Name: frontend.marathon.mesos
Address: 192.168.0.2
Name: frontend.marathon.mesos
Address: 192.168.0.3
Name: frontend.marathon.mesos
Address: 192.168.0.1
Since the app is running with its own IP, we don’t have to port forward across the Agent. Instead, we can access our web app using the IP and port of the app directly. Curling our app privately on port 80 (from the public slave), we’ll see its data:
$ curl frontend.marathon.mesos
1 views! Reporting from 9ab5c5975fde
Curling our database won’t receive a response, since, though we can route to the resolved IP address, the database’s policy is locked down to only allow traffic from the frontend:
$ curl --connect-timeout 5 database.marathon.mesos:6379
curl: (28) Connection timed out after 5001 milliseconds
Step 5: Load Balancing External Traffic to our Application
Now that our app is running, let’s connect it to a load balancer to share it with the world. Calico is compatible with Marathon Load Balancer, which forwards traffic across a public slave to our private, Calico-networked containers.
Marathon-lb must be launched with the auto-assign-service-ports option. To accomplish this, select the Marathon-LB package, but enter the Advanced Installation settings, and select the auto-assign-service-ports box:

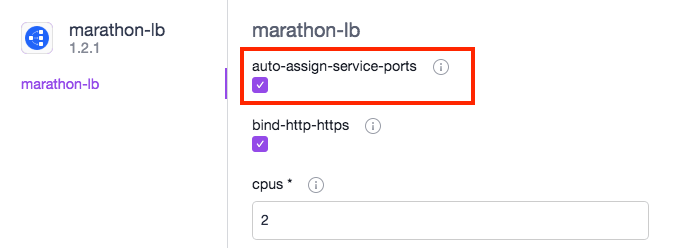
This option allows Marathon-LB to workaround a service-port bug that exists in Marathon for ip-per-container applications.
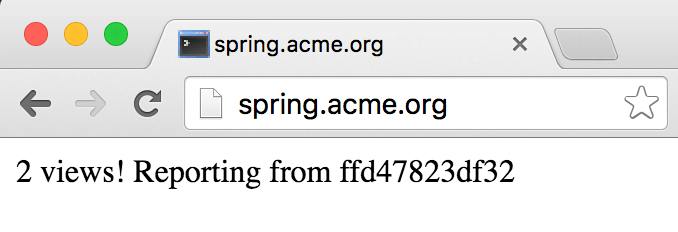
If we look back to our app’s frontend marathon JSON, we’ll see we added a VHOST entry to our frontend:
"HAPROXY_0_VHOST": "spring.acme.org"
Adding this label tells marathon-lb to configure a virtualhost entry for the application. With a DNS entry that resolves to my public slave, I can visit spring.acme.org to see our application:
Conclusion
By adding Calico to our DC/OS cluster, we’ve simplified networking and introduced fine-grained security to our Mesos applications. We saw how simple it is to add Calico to a standard DC/OS cluster using the new Calico Universe package, and how it all works in action by deploying a sample web application.
We look forward to working with the community to further improve Calico’s DC/OS integration. If you’re interested in contributing:
- Join our Support Slack
- Contribute on Github
- Reach out to us @projectcalico on Twitter
Join our mailing list
Get updates on blog posts, workshops, certification programs, new releases, and more!